Products to Beat the Heat!
Summer break is in a couple of weeks and that means swimming, tanning, and binge watching every Netflix show! Since we’re in Texas, summer weather can get pretty hot almost every day, and our makeup can’t always look perfect when it’s 100 degrees outside. And who has time to worry about their makeup smearing around when you want to take a dip in the pool? Luckily, I’ve compiled a few products that are waterproof and will last through this crazy summer weather we’re about to have!
Urban Decay – All Nighter Liquid Foundation
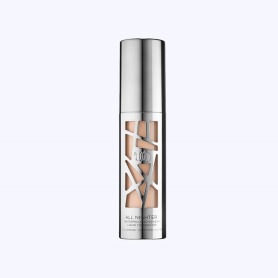
This formula is perfect for hot weather because it’s matte, long-lasting, and full coverage! It sells for $40 and since its coverage is so strong, it’ll be worth the money because you only have to use a small amount each time you apply it.
MAC – Pro Longwear Concealer

This product has been around for a long time and is loved by so many beauty gurus! It’s known for its full coverage and lasting wear (the name, duh!). I’ve worn this concealer throughout the summer and swimming, it lasted even when my other makeup smeared off. This product is a great one to try out and retails for $24. (Fun fact: Ulta Beauty now sells MAC)
Too Faced – Waterproof Better Than Sex Mascara

Mascara is the first product to smear and mess up during the summer, whether it’s from the pool, sweat, or transfers onto your skin. The most fool-proof way to wear mascara when you’re worried about smudging is to buy the waterproof version! A great mascara that’s on the market right now is Too Faced Better than Sex Waterproof. It gives you a lot of volume and length while also lasting all day against water and sweat.
Tarte – Clay Pot Waterproof Shadow Liner
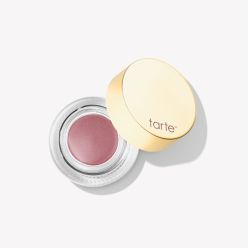
Eyeshadow isn’t something you naturally think of to be waterproof, and that’s because there aren’t a lot of options on the market. But a great product to use when you still want to have some color on your eyes, but you’re worried it’ll just melt off with the heat, try these cream eyeshadows from Tarte. They come in 5 shades, can double as an eyeliner, and retail for $21.
-Mia Bissey
My Ride or Die Makeup Products
Hello Beauties!
We all have our favorite makeup products that we reach for on a daily basis and can’t seem to stop using. I’ll be talking about some of my ride or die makeup products that I can’t seem to live without no matter what I do.
Primer:

If you suffer from dry skin, but still can’t use any primers with oil in it then it’s hard to find a primer that moisturizes your face without causing breakouts. Physician’s Formula Rose All Day Primer applies more like a serum, but it feels so cool and moisturizing on the skin all while giving you a glowy and dewey look that lasts all day. When I first got this product, it was definitely an impulse buy. I had no idea what it would do, but I’ve been going through a rose phase (addiction) lately and I felt as though I needed it.
My favorite thing about this product that makes it a ride or die product is that it moisturizes my skin (like I’ve mentioned like 10 times, sorry), but it also feels tacky on the skin which makes my foundation really stick to the skin and stay on seemlessly throughout the entire day!
Foundation:

Now I realize that I already said that I have super dry skin, so my favorite foundation might be surprising. I find myself reaching for the Wet N Wild Photo Focus Foundation in the shade Porcelain (I know, I’m pale). This is a very mattefying foundation that people with dry skin really shouldn’t wear. I used to only reach for this product on days that I felt my skin wasn’t cracking much. However, I’ve always LOVED the coverage (and price) of this product.
The reason I find myself reaching for this product on a daily basis now is because of my primer (I love this primer, don’t judge). Because of the moisturizing effects that it has, I can get away with wearing matte foundations without the cracks and dry patches on my face being the star of the show. The combination of these two products give my face a seemless and photoshopped look that I can’t not wear!
Eyeliner:

Okay, so this eyeliner has been my ride or die since Junior year of high school. The Kat Von D Tattoo Liner is THE BEST eyeliner that I am forced to keep buying it everytime I’m in need of an eyeliner. I have bought so many cheaper “dupes” of this eyeliner trying to find something that even resembles the amazingness of this product, but I just can’t seem to find anything that works just as well.
What makes this product so great is that the applicator is kind of revolutionary in the makeup industry. This eyeliner has a brush tip which gives the applicator a flexibility and fineness to easily (with a little bit of practice obviously) make a straight line and a sharp wing. It’s gotten to the point (pun intended) to where I can’t even use felt tips because they frustrate me so much.
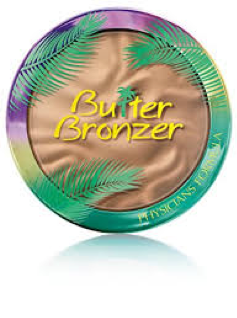
Bronzer:

Physician’s Formula makes it on the list again with their Butter Bronzer. I absolutely love this product so freaking much! The reason this product is on my list is because it is my favorite makeup dupe. If you want the quality of the Hula Bronzer that SEPHORA sells, than look no further. This product is about half the price with the same quality and blendability.
What I love about this product other than it’s blendability is that they have a light enough bronzer for my super pale skin. While I realize that Hula has a light skin version of their bronzer now, they didn’t make it soon enough because I started using Physician Formula’s version prior to the launch of Hula’s new product. The shade is buildable and I can easily bronze my skin up without having to make sure I go SUPER light handed with this product. Your pale girl wants to be tan too, y’all!
While the list can go on, these are my top four ride or die makeup products that I highly recommend to anyone who wants a product that they can depend on!
May your vibes be good and your wings be sharp!
-Dana Hiser: Admin.
Email: dlh226@txstate.edu
Insta: @dana361
Twitter: @dana_361
Is it Still a Ride or Die?
This week I decided to pull out an eyeshadow palette that I have not used in years. Back in high school I would use the Naked 1 palette every single day. Since it was a favorite back then I was curious to see if it would still live up to the palette I fell in love with when I first used it.

The first look I decided to create was just a simple natural look. I started out by using Naked as a transition color in the crease and all over the lid. Then I took Baked onto the outer corner of my lid and brought it into my crease. I also took Baked and dusted it under my bottom lash line for definition. Lastly, I finished the look by putting Sin all over my lid and Virgin into my inner corner. I then took Naked again and made sure everything was blended together.
After seeing the finished look, I immediately fell back in love with this palette. Sin used to be my most used eyeshadow from this palette and I can gladly say it does not disappoint. I wore it for about 6 hours and it stayed like this until night time. This look is perfect for every day eye looks; it also takes absolutely no time to throw it
Now for night time I wanted something a bit darker but still wanting to keep the original color scheme. I decided to put Dark Horse in the outer-v of my eye to deepen up the look. I also took it under my bottom lash line closer to the lashes. I was a little worried about this color since it does have a little glitter to it. But I was taken to surprise when it transferred onto the eyes as a sheen finish. Which made it look even more.
This palette has once again snuck its way back into my everyday makeup collection. The Naked 1 palette will always have a special place in my heart since it was the first high end palette I’ve owned. I own Naked 1 through 3 and the first one is the one I’ve used the most. This is definitely still a Ride or Die eyeshadow palette. I would still recommend getting this palette because it will never disappoint.

-Brittany Rice
All about Foundation!
My favorite part of my makeup routine is putting on foundation. It brings the look together and can also be the main focus. For winter, I go for more a matte look with foundations that have a satin or powder finish. But now with the warmer weather, I love to go for a glowy look. Personally, I have an oily t-zone (forehead, nose, chin) so a luminous foundation can sometimes be tricky to wear without becoming a greasy mess. But after many trial and errors with different brands, I’ve compiled a group of really amazing foundations that give me that great glow for the spring/summer, while also keeping my face from getting super oily.
It Cosmetics – Your Skin But Better CC Cream

This CC cream might be mistaken as light-coverage by its name, but it actually has medium to full coverage! It has a natural finish so it’s perfect for an everyday look and I especially love it because it lasts all day. It retails for $38 but trust me, it’s worth the extra buck!
Neutrogena – Hydro Boost Hydrating Tint

Again, don’t be fooled by the name – this foundation is much more than a tint. It has medium but buildable coverage and a dewy finish. This one is also good for everyday but can be used for a more glam look as well. The doe-foot applicator makes application super easy too! I’m able to put this one on and blend it out in a couple of minutes. It retails for about $13 making it pretty affordable for a good foundation!
L’Oréal – Infallible Pro Glow Foundation

This foundation is made specifically for dry skin but I am able to get away with using it by powdering my t-zone. Of all the foundations I am mentioning, this one gives the most glow. It’s perfect for warmer weather because it has SPF 15 and will all day through this harsh Texas heat! I love pairing this foundation with minimal concealer and lots of bronzer. It retails for $11, which is a steal!
Covergirl – Vitalist Healthy Elixir

Covergirl often has many hits and misses, but this foundation is definitely a HIT! This foundation would be a great addition to your collection because of its full coverage and has vitamins that heal your skin. The finish is dewy and natural and it retails for $10. If you are wanting that “summer glow”, give this one a try!
I hope you enjoyed this look into my glowy foundation faves for the spring/summer! Have an amazing week and stay funky!
Instagram: miaa__
Pinterest: Mia Bissey
Email: mdb181@txstate.edu
Real Technique’s Silicone Makeup Sponge: Buy or Bye?
Hello Beauties!
This week, I tried the Real Technique’s Silicone Makeup Sponge to see if it was worth a buy. None of us like cleaning our Makeup Sponges, and they get really gross when they start getting moldy. I have tried using brushes instead, but I can never get a seamless look when putting on foundation and concealer without a Makeup Sponge. I personally use the Real Technique’s Makeup Sponge because it’s more affordable than the Beauty Blender sold at SEPHORA, and we all know I prefer the cheaper deal if it works just as well as the original.
The Sili-Sponge, as I like to call it, looks something like this.

I think it’s cute that it follows the Real Technique’s aesthetics and branding with it’s orange color and unique shape. I also like the idea of being more hygienic with makeup since my face breaks out with everything.
While trying out this product, I tested it out on the right side (aka left in the pictures) of my face and used my trusty makeup sponge on the opposite side of my face for comparison.
Foundation:
I used my favorite Wet N Wild Photo Focus Foundation that I’ve written about in the past, so that I could see how well the Sili-Sponge applied the product. While using the product, I noticed that it didn’t take nearly as much foundation to get the coverage I wanted with the Sili-Sponge than I normally use with the Makeup Sponge. That was definitely a plus!
However, I also noticed that it took FOREVER to blend the foundation out with the Sili-Sponge. The directions on the packaging says that in order to get a seamless application, to use a damp Makeup Sponge to get rid of any streakiness that may occur. For testing purposes, I didn’t do that because then it would be pointless buying this product.
Here’s a side-by-side comparison of the foundation:

Silicone Sponge

Makeup Sponge
Concealer:
Next was applying concealer. I used the Wet N Wild Photo Focus Concealer because it’s just as good as the foundation in my opinion (though, a lighter shade than Light Ivory would be awesome for someone as pale as me, just saying). Again, I used the Sili-Sponge on one side of my face and my Makeup Sponge on the other side (same as the foundation). The Sili-Sponge actually did a really good job at blending in my concealer under the eyes! I was really surprised! The only thing I noticed is that I couldn’t reach the inner-corner of my eye as well as I can with the Makeup Sponge, but other than that it was fine!
I also used the Sili-Sponge to blend out the concealer on my nose, and that was much harder because it can’t form to your face like the Makeup Sponge can. So in regards for that, I was slightly disappointed.

Silicone Sponge

Makeup Sponge
Baking:
Last thing I tried was baking with this product. The Sili-Sponge baked fairly well underneath my eyes, but I also bake my nose because your girl wears sunglasses and needs that makeup to stay on all day! I had the issue with the Sili-Sponge not forming to my face on the nose area again, so that was slightly annoying. It also didn’t pick up as much product as the Makeup Sponge, so it took longer to apply the powder with the Sili-Sponge than I would’ve liked.
Here’s what my bake looked like:

I didn’t have any cream contour or highlight to test out the Sili-Sponge with, so unfortunately that completed my test. Here’s what the end result of my makeup looked like.

After all the makeup was set and completed, I will say my makeup looked just fine and I didn’t notice any difference throughout the day in terms of wear and tear. However, I will say that I would not recommend purchasing this item. The Real Technique’s Silicone Sponge retails for $5.99, so it is cheap and I will use it on makeup days where I have more time to do my makeup. The main thing that turned me off of this product, however, is the fact that it took forever to blend with foundation and the fact that the silicone applicator can’t form to your face as well as a real sponge which makes it difficult to get into all of the crevasses of your face. Also the fact that even the directions on the packaging recommends you still use the makeup sponge for a “seemless effect” makes me wonder what the point of this product is.
May your eyeliner be sharp and your vibes good!
-Dana Hiser, Admin.
Want me to test out makeup hacks or products? Contact me at…
Email: dlh226@txstate.edu
Instagram: @dana361
Twitter: @dana_361
Products Youtubers made me Buy:
I have been a fan of the Youtube community for as long as I can remember. There has always been a handful of people that would always influence me to buy a product.

ABH Amerzy Highlighter – everyone
After falling in love with this product through social media and Youtube I caved and decided to give it a try. I have not been this excited for a product since I ordered my first Natasha Denona eyeshadow palette. Seeing this drop dead gorgeous product in person is an absolute dream. If I could I would stare at it all day. Besides it being stunning it is also absolutely gorgeous on the skin. It gives a nice almost wet look to the skin. This is the perfect highlighter, especially for those out there who like a glow from within look. It has a very natural look on the skin but is still extremely blinding. You can also build it up to your desired look!
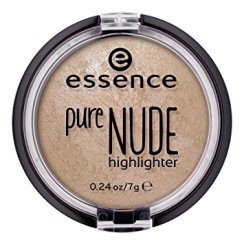
Essence Pure Nude highlighter – Kathleenlights
Kathleen has always been someone I go to for recommendations for face products since we both have very dry skin. This product sure did not disappoint me. It gives a very nice natural glow to the cheeks but still can be built up to be blinding. This is a very affordable highlighter which can be found at any retailer that sells Essence.

Maybelline Dream Cushion Foundation – Melissa Alatorre
A month ago Melissa Alatorre posted a “Dewy Skin & Soft Smokey Eyes Valentines Day Look” video onto her channel. In this video she used this cushion foundation and mentioned how dewy and glowy it makes the skin. I’ve been wearing this foundation for the past month and am absolutely in love with it. It gives a nice light to medium coverage and a beautiful dewy look. This foundation is perfect for those who have dry skin. I am huge into cushion foundations and always trying different ones out. This one has to be my favorite by far.
-Brittany Rice
Spring 2018 Makeup Trends
Spring is finally here and you can definitely see it in San Marcos! The sun is out and tons of people are gathering at Sewell. So let’s put our furry coats and vampy lips away, and bring out our shorts and glowy skin! Here are some of the spring 2018 makeup trends that you might want to try this season.
Bold Solid-Color Eyeshadow
A big trend I’ve been seeing on the runway and on fashion influencers, is bright, bold eyeshadow. The models wear bright shadows across their entire lid, with no other colors to emphasize the boldness of the look. This fun eyeshadow look is best paired with clean, glowy skin. If you’re feeling fun and daring, try out this trend!
Fresh Skin & Flushed Lips
A big trend every year for springtime is fresh, clean skin. For 2018, this trend has been changed by pairing it with flushed lips. A lot of makeup brands have come out with a “flushed lip” product such as Colourpop’s Blotted Lippie. The lip is natural but gives a pop of color to your face, a perfect match with the simple face makeup. This trend would be great to wear for a day at the beach, or when you want to wear light makeup and let your natural skin shine through.
Inner Corner Pop of Color
Pops of color are very popular for the spring season, so to incorporate this trend into your makeup looks, add a bright colored shadow to your inner corners. This can take a simple look to a new level and brighten up your face.
I hope you enjoyed these new trends and try some of them out this spring break. Stay funky!
Mia Bissey
Instagram: miaa__
Pinterest: MiaBissey
Email: mdb181@txstate.edu
My Boyfriend Tells Me How to do My Makeup
One video you see on every makeup guru’s YouTube channel is the “My Boyfriend Does My Makeup” video. Well, while I would love to jump on that bandwagon, but I have actually let Nick do my makeup in the past, and trust me, it wasn’t pretty!
So needless to say, he’s no longer allowed to come near me with makeup.
Instead, I let him tell me how to put on my makeup. He told me what products to use, what brushes (if needed) to use, where to apply the makeup on my face, and how to apply it.
The first thing he told me to do was put on my Elf Primer, spray Rose Water on my face, and then put on my Wet n Wild Foundation with my Real Techniques makeup sponge. By this point, I was very impressed and had high hopes for this challenge. After that, he told me to set it all with my Cady Airspun Powder and use the velour puff that it comes with. Aka, we skipped concealer under the eyes. Like, WHAT? But I went with it, and told myself “it’s fine, everything’s fine” and moved on.
After this, he took my Hula Bronzer and an eyeshadow brush that I typically use for, you know, eyeshadow, and told me to put it in the hollows of my cheeks. While he did hand me the wrong brush, I was impressed when he told me “let’s add some depth to your cheeks!” At least that that shows you that he knows (kinda) what bronzer (contour) does?

He then told me to take my Kat Von D Tattoo Liner and put it in. my. waterline??? So I very VERY carefully did this. He then told me to put my Cover Girl Mascara on my lashes (finally something I can do!). He pulled out another one of my liquid eyeliners, and told me to draw wings on both of my eyelids. He gave me specific instructions to end the wing at the bone past my eye, so I did (definitely the longest wing I’ve ever drawn on my eyes).
After that, Nick picked up my Butter Bronzer from Physician’s Formula, and handed me a smudge brush and told me to put it on my cheek bones (aka. where highlight should go). After I did what he told me he couldn’t see the difference. I, however, definitely saw the tragic difference.
We then moved on to the eyebrows. I saw Nick pick up my NXY Brow Pomade – which I was really excited about, but that happy feeling went away when he made a weird face at it and put it down. As I’m watching him go through my makeup, all I see is him pull out my ColourPop Lipliner in the shade Beeper (a dusty pink/taupe color). When he hands me the lipliner, I can’t keep a straight face any longer and just die of laughter. He looks at me and asks “is that not right?” Without a word, I fill in my brows. Now I will say, that lipliner went on like a dream and I didn’t even needs concealer to carve out my eyebrows, so at least there’s that.

He then told me to put on my NYX Liquid Lingerie Lipstick, and to spray my face with more Rose Water. I did what he said, and that completed the look!
What do y’all think? Could pink eyebrows be a new trend? Probs not!
Until next time….
Keep the eyeliner sharp and the vibes good!
-Dana Hiser (Admin.)
Insta: @dana361
Twitter: @dana_361
BUY OR BYE: Cushion Eyeliner??
Over the past few years there have been cushion foundations, highlighters, and blushes popping up. Personally I have never seen an eyeliner in cushion form so it definitely caught my attention.
Scrolling through the Ulta website, I came across the Catrice Liquid Gel Cushion Eyeliner. This product is said to be to be a highly pigmented lightweight liquid-gel liner. It only comes in one shade, that being the dark black. It is also a 0.1 oz product, which is pretty typical for a gel liner and priced at $6.99. As soon as you open the product you can already tell just how pigmented it will be. The cushion sponge is so soaked it looks like it will last you months. It doesn’t come with a brush to apply it but that can easily be fixed by picking up any eyeliner brush.

Now for the product itself, after swatching it on the back of my hand I had very high hopes for this product. It does dry down a bit glossier than I would like my eyeliner to be but it still looked beautiful. It applied very smoothly and pigmented. The eyeliner was thankfully not as watery as I thought it was going to be. Safe to say, I was excited to how this was going to wear throughout the day.
Throughout the day I would do little check-ins to see how the eyeliner was holding up. Every time I looked at the eyeliner it still did not budge a bit. It also still had just as much pigment as it did when I put it on. I wore it for about 8 hours before taking it off. The eyeliner is pretty easy to take off at the end of the day as well.
This cushion eyeliner has found a place on my top shelf. It’s pigmented, does not smudge, semi-matte, stays on all day, and easy to take off when you want it to. Did I mention it’s budget friendly? Next time you are looking for an eyeliner I highly suggest giving this product a go.
-Brittany Rice
The Perfect Lippies for Valentine’s Day
Hey makeup lovers! With Valentine’s Day coming up this week, I thought I would share with you some lip products that I think would work perfectly for your date night-looks (or if you just feel like getting glam for a night in).
NYX Lingerie Lip – Dusk To Dawn

Processed with VSCO with nc preset

Processed with VSCO with hb2 preset
This is a liquid lipstick that has a satin finish and would be perfect if you want a more natural look or to pair with a dark smokey eye.
Colourpop Ultra Matte Lip – Donut

Processed with VSCO with nc preset

Processed with VSCO with hb2 preset
This lippie is a bright pink with an extreme matte finish. It will definitely last through all the food and chocolate you eat!
MAC – Whirl

Processed with VSCO with nc preset

Processed with VSCO with hb2 preset
I love this lipstick because it gives me 90’s vibes! It’s a warm nude-brown that can be made more dramatic, but paired with a simple eye, can also be worn every day. If I were to wear this for Valentine’s, I’d pair it with smoked out winged liner and a neutral blush.
Milani Amour Matte Lip Crème – Gorgeous
This liquid lipstick is my favorite by far because the color is so vibrant! It is a magenta-red and it has a matte finish. If you’re feeling bold, try this one out.
MAC- Ruby Woo

Processed with VSCO with nc preset

Processed with VSCO with hb2 preset
Last but not least, the famous red lippie! There’s something about a red lipstick that gives you so much confidence and that “boss lady” attitude. This one has a matte finish and is kiss-proof!
I hope you find your perfect lippie and have an amazing Valentine’s Day! Stay funky!
Instagram: miaa__
Pinterest: miabissey
Email: mdb181@txstate.edu
What’s in my Ipsy Bag?
So to start off the new year, I subscribed to Ipsy Glambag. Ipsy is a makeup company that you can subscribe to for $10 a month and they will mail you 5 sample-sized makeup products to try out each month.
When you first join, you have to fill out a survey over what makeup products and brands you like the most. When I first filled this survey out, I mainly went for liquid lipsticks, highlighters, and face-care products because those are products that I tend to use the most. You can always go back later on and change your preferences, so don’t feel like you’re committed to certain products.
Depending on when you sign up during the month, you might not receive your Ipsy bag the first month, but I was lucky enough to get mine. In the bag I received 2 Purlisse Face Masks, a full-sized Ofra Liquid Lipstick, a Smashbox Gel Eyeliner, a Pixi by Petra Highlighter, and a Face Cleanser.

For a makeup lover, opening the Glambag felt like Christmas all over again! I immediately swatched the Lipstick, eyeliner, and the duo highlighters.

I tried out the swatched products, during the Fashion Merchandising Career Forum to see how well everything would hold up. However, I forgot to take closeup pictures before and after (it’s fine, everything’s fine).
I wore my makeup for about 15 hours that day, and the lipstick stayed on well for the most part. However, it did fade a little bit throughout the day, but because the color of the lipstick was close to my natural lip color, it wasn’t very noticeable.
The eyeliner did not budge whatsoever, which I was really happy about because I put it on my bottom waterline. I don’t know about you, but my eyeliner always fades on the bottom waterline. Needless to say, that became an everyday eyeliner.
The highlight was nice, but it definitely wasn’t blinding. The highlight was more subtle than I personally like, so I did add the Maybelline Chromatic Highligher to add a more pop of color. However, I do wear that highlight on days where I wear less makeup for a more natural look.
The face-care items that were included in the Ipsy bag were very nice. The face mask was hydrating and lifted my face at the same time which I personally liked. The face cleanser wasn’t my favorite, but it did feel like it got the job done and helped remove whatever excess makeup was on my face at the end of the day.
Overall, I loved the Ipsy Glambag and will continue my subscription with them. If you’re one of those people like I am that are scared to buy luxury makeup products without trying them out, I definitely recommend subscribing to Ipsy. It’s affordable and fun! What more could you want?
Keep your vibes good and your eyeliner sharp!
If you have any makeup products or hacks that you would like me to try out, please let me know at…
dlh226@txstate.edu
Twitter: @dana_361
Insta: @dana361
Thanksgiving Makeup Looks
Hey makeup lovers! With Thanksgiving coming up this week, I thought I would give you some inspiration for looks that you can rock while scarfing down your delicious grub. This holiday is all about spending time with loved ones and eating as much as you possibly can, but who’s to say you can’t wear a bronze smoky eye to dinner? Here are a few makeup looks I picked out that are perfect for the day!

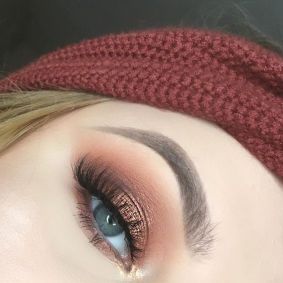
This look is perfect if you want to go for something more subtle but still want to be glam for the holiday. Use a mixture of burgundy, brown and a dark gold eyeshadow to create this fall eye look.
This next look is a little more glam but still pretty subtle for the occasion. The neutral shades means it will go great with any outfit you choose for Thanksgiving, even if its sweatpants to embrace your food baby! To create this look, use gradient shades of brown and a neutral gold shimmer on the lids.

For those who love dramatic makeup, this one is for you! The gold shadow cut crease and brown lip is perfect to match the “fall aesthetic”. If you want to go all glam to your turkey dinner, get your black, gold, and brown shadows out and pair it with your matte liner to create this look. Find the perfect brown lippie to top it off!

Last but not least, here’s a makeup look for those who want to put an artistic twist on a basic smoky eye. Of course, this one is a little silly, but still super fun! If you try this one out, you’ll be the talk of the night. To create this very festive look, take a black, brown, orange, and gold liner to create the shape of the pilgrim hat and fill it in!
And remember, don’t let those pesky family members get you down about your love of makeup!

I hope these looks sparked some creativity and help you find the perfect Thanksgiving makeup this year. May your day be filled with lots of delicious food and laughter. Have an awesome holiday and stay funky!
Mia Bissey
Instagram: miaa__
Twitter: mia__danielle
Email: mdb181@txstate.edu
How to Tweeze your Man’s Eyebrows
Hello makeup lovers!
Eyebrows are an important thing when it comes to the makeup community. Women tend to care more about their eyebrows than men do. However, that doesn’t mean men don’t want to tame their eyebrows every now and then.
I used my boyfriend as a guinea pig for this article, but that’s his fault for dating me so it’s fine!
Nick has really nice eyebrows to begin with, so I didn’t have to do much. And honestly, when plucking most guy’s eyebrows, you really don’t want to do much unless they want perfectly arched eyebrows.
When plucking a guy’s eyebrows, remember that they aren’t used to the pain of tweezing like we are, so be careful with them! They will flinch a lot, making it easy to pinch their skin. I have made the mistake in the past (last night) of not being more careful and accidentally pinching Nick’s skin (sorry hun).
When tweezing below the brow (under the arch), pull their brow up so that the skin is stretched in order to reduce the risk of hurting them. Also, make sure not to remove ALL of the hairs that are under their brow, because remember, they don’t need perfectly arched eyebrows (unless they so desire). Just tweeze their brows enough to clean it up a bit in a subtle way.
When tweezing above their brows, just make sure to get the hairs that are clearly not meant to be there. Again, you just want to clean it up.
Finally, tweeze in between their brows so that they don’t have a unibrow going on.
Don’t forget to look at him straight on to make sure his eyebrows match. That way you can perform the last few touches to making his eyebrows perfect!

Before

After
It’s hard to see the difference from the before and after because A) it’s subtle, and B) the lighting is different in both pictures (sorry!!). However, if you look closely, you can see that I cleaned up his arches a bit on both the top and bottom, as well as cleaned up in between his brows.
I hope that you found this article helpful when plucking your boyfriend’s, friend’s, or brother’s eyebrows!
Keep the vibes good and the eyeliner sharp!
If you have any beauty products or hacks that you would like me to try, please contact me at:
Email: dlh226@txstate.edu
Insta: @dana361
Twitter: dana_361
New Products to Put In Your Shopping Cart!
It’s the holiday season and that means it’s time for makeup brands to bring out their hot, new products. There are tons of new trends this season and these products are the perfect thing to make sure you’re on trend and in style!
First item to put in your shopping cart is the Huda Beauty – #FauxFilter Foundation. Huda Beauty is known for their trendy products and is really popular among the Instagram Beauty Gurus. The foundation is medium to full coverage, has a satin/matte finish, comes in 30 shades, and retails for $40.00.

Anyone who hasn’t heard of this next brand, has been living under a rock! Fenty, Rihanna’s new and booming makeup line, has put out so many amazing products that the beauty community is loving. The brand recently released a galaxy themed makeup line and the product to keep your eye on is the new Fenty Beauty – Galaxy Eyeshadow Palette. Stay on the metallic trend with these 14 colorful glitter shadows for $59.00!

Glossy lips are in and to get the perfect look, use the Colourpop – Feelin’ Fine Lip Gloss Trio. This set includes three fall inspired shades that are duo-chrome and NEVER sticky for $18.00. These glosses are my favorite formula so I definitely recommend giving them a try!
Last but not least, is the Sephora – Winter Flush Blush Palette. This palette suits a huge range of skin complexions that all have a warm undertone that’s perfect for the “all-over bronze” trend for fall. It comes with 8 shades, matte and shimmer and retails for $16.00. For that many shades, that price is a steal and Sephora never disappoints with its products.

-Mia Bissey
Halloween on a Budget
Hello Makeup lovers!
It’s that time of year where broke college students try to find costumes on a budget. If you’re like me, you might not want to go looking for a costume even if it is a cheap one. Well, I have some drugstore makeup products that can help you achieve a sweet Halloween themed makeup look.
First things first. One of the easiest and most common Halloween makeup look is the Spiderweb.

Whenever I do this makeup look, I always use Jesse’s Girl Waterproof Liquid Eyeliner. This eyeliner is my favorite dupe for the Kat Von D Tattoo Liner! Much like KVD’s eyeliner, it has a brush tip applicator. I personally like brush tip liquid eyeliners because it’s easier to control your application and gives you nice, sharp lines!

Another makeup look that’s pretty popular for Halloween is the Deer makeup look.

For this look, you’re gonna wants a good bronzer! My favorite drugstore bronzer is the Physician’s Formula Butter Bronzer. This product is a great dupe for the Hula Bronzer. It’s blendable, pigmented, and beautiful on the skin! Definitely a good product for this bronzy, Halloween look!
The last easy makeup look for Halloween on a budget is a simple vampire look.

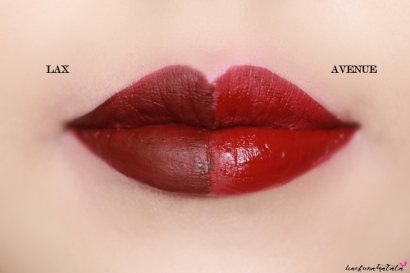
The most important part of this makeup look, is a good lipstick. I like to use Colourpop Ultra Matte Liquid Lipsticks for this look. I tend to use a combination of the shade LAX and Avenue. Both of these reds have a blue undertone. Using a mixture of these lipsticks, you can make this look like dried up blood dripping down your lip.
Halloween is my favorite time of year in the makeup community specifically because you can create something amazing and creative without having to spend a ton of money on a costume. I challenge all of you to either recreate one of these makeup looks, or come up with your own!
Keep your eyeliner sharp and your vibes spooky!
Dana Hiser – theFMAdaily Admin.
If there are any makeup products or hacks that you would like me to try, let me know!
Email: dlh226@txstate.edu
Insta: @dana361
Twitter: @dana_361
Fall Makeup Trends 2017
One of my favorite things to read up on are seasonal trends, and more specifically, makeup trends. It’s always fun to see the new eye looks and lip color shades that are popular for the season. It sparks some creativity in me when I’m feeling kind of bored with my makeup routine. Fall 2017 brings some new looks and some old ones from previous seasons; here are a few of my favorites!
Vampy Lips
This one might seem obvious, but it’s a trend that continues to come back every season. This trend can be worn with a light berry lip such as Anastasia Beverly Hills liquid lip in “Craft”, to a red-black such as Kat Von D’s “Exorcism”. Pair it with a bare eye, or go all out and do a bold smokey-eye to match the bold lip!
Metallic Everything!
The metallic trend boomed earlier this year but it’s trailing into the fall season with warm golden eyeshadows, darker metallic lips and metallic nails. Shine is definitely in style in the makeup world right now! This trend can be worn on the eyes with a light wash of a dark gold shadow or with popular metallic liquid lips such as Colourpop Ultra Metallic Lip in “Mugshot”. My favorite metallic eyeshadow for fall is Mac “Amber Lights”.
Bronzer as Blush
Fall means everything warm-toned! Your clothes, hair, eyeshadow, lips, and now… your cheeks too! Rouged cheeks have been in style for a long time now, but it’s slowly getting pushed to the side as more makeup lovers are using bronzer as blush to give an all-over warmer look. Using bronzer all over the cheeks helps tie in a warm-toned lippie as well as the warm tones in your shadow. My favorite bronzer to use is, “Hoola” by Benefit!
Monotone Look
Subtlety is becoming more and more popular these days and a way that makeup lovers are achieving this without giving up their everyday “beat” is with the monotone look. This means all parts of your makeup are the same tone/color. Your lipstick, eyeshadow, blush and highlight keep a neutral, monotone look that goes perfectly with this sweater weather.
I hope seeing some of this season’s makeup trends inspired you to try something new or to crack out your vampy lips already! Have an awesome week and stay funky!
Instagram: miaa__
Twitter: mia__danielle
Email: mdb181@txstate.edu
Wet N’ Wild Liquid Catsuit Lipstick: Buy or Bye?
Now if you’re like me, you’ve been on the hunt for the perfect long lasting liquid lipstick for quite some time. I’ve tried almost every liquid lipstick that claims to last all day and so far, no luck. That’s not to say that I don’t have lipsticks that I like more than others and that there aren’t lipsticks that I can touch up minimally throughout the day. But who’s got time to go to the bathroom every time they finish eating a meal to touch up their lipstick?
I came across the Liquid Catsuit Lipstick by Wet N’ Wild on Makeup Guru, Tati’s, channel. She reviewed this particular product while at a makeup convention in LA and had nothing but wonderful things to say about it! I’ve been waiting to come across this product and I finally found it at HEB the other day!
This is what the product looks like!

I was able to snag this product for about $4.68 at my local HEB in the shade Nudist Peach. This is a beautiful pinky-toned lipstick that I thought might suit my skin tone well. There were also limited options at HEB, and I tried to find the closest thing to a nude that I could find, but they do have beautiful darker lipsticks as well that I might purchase if I like this product!
When swatching this lipstick, I found that the pigmentation was fairly opaque. Let’s be honest, who doesn’t like that in a lipstick? I put it on my lips and wore it for as long as I possibly could without touching it up.
This is what the lipstick looks like after application!

I wore this lipstick knowing I had a full schedule and would be away from my apartment for about 10 hours so that I could fully put the longevity of this product to the test. I will also be testing to see if this product is transfer-proof, food-proof, and everything-proof by drinking coffee, eating Chinese food, and just seeing if it crumbles off throughout the day!
Because I’m a coffee addict, the first thing I do on a daily basis is drink coffee.
As you can see my lipstick transferred onto the mug, so while I wouldn’t call this lipstick transfer-proof it is transfer resistant!
After lunch, I was surprised that my lipstick had not crumbled off to be honest! The lipstick was starting to fade off on the sides of my mouth, but that’s not uncommon when it comes to a lipstick. But I gotta admit, the lipstick was still going strong by this point. That being said, my lips started to feel dry and tacky that it was slightly annoying throughout the rest of my day.
By the time I got home, I was itching to take off this lipstick! This is what it looked like after about 9-10 hours of wear with no touch ups (ps. sorry for the bad quality/lighting).
Overall, I’m not sure how I feel about this product. On one hand, this product really did last all day. On the other hand. This product really is transfer resistant and long lasting! On the other hand, after several hours of wearing this lipstick I had trouble dealing with the fact that this product is very drying and became tacky throughout the day. I have tried many liquid lipsticks to where I feel as though I can wear cement on my lips and be fine, so the fact that this lipstick was bothering me was kind of ridiculous. If you don’t like the lipstick being super drying then I definitely do not recommend this product.
That all being said, the lipstick is less than $5 and it does stay on all day which is what it claims to do. With that in mind, the Liquid Catsuit Lipstick is a good liquid lipstick.
Keep the vibes good and the eyeliner sharp!
-Dana Hiser | Admin of theFMAdaily
If you would like me to test out new products and hacks, you can contact me at…
Email: dlh226@txstate.edu
Insta: dana361
Twitter: dana_361
Fall Favorites
Fall is officially upon us and that means swapping tank tops and shorts for sweaters and scarves and… everything pumpkin spice! I love fall because not only because of the cooler weather and beautiful colors it brings, but because us beauty lovers are able to get away with wearing a little bit more and a little bit darker makeup than what we do in the summer. So basically; dark lips, smoky eyes, and a snatched contour! Today I’ll be sharing with you my go-to makeup items that I’ll be using this season.
Face

The first item I’ve been absolutely loving is this foundation from Maybelline. It’s called the Fit Me – Matte and Poreless. I tend to have a very oily t-zone (nose, forehead and chin) and it’s difficult to keep that oil under control, especially if I’m out and about or walking from class to class. With this foundation, I don’t have to worry about that at all! It keeps my “natural dew” to a minimum while also giving me great coverage that lasts through that stubborn Texas sun. Compared to my other foundations, I’ve found that my blush and bronzer blends a lot easier with this one and doesn’t fade after just a couple hours. If you’re looking for a new foundation to try, I totally recommend this one!

This next product has been a life saver all through summer and will continue to always be in my makeup bag throughout this fall. It is the NYX Matte Finish Spray. Like I said earlier, I have a tendency to get oily, so just a couple sprays of this right before foundation and when I finish my whole face, keeps me matte and my makeup intact. NYX has another variation of this spray, so if you have a different skin type or are looking for a different finish for your foundation, try out their dewy spray.

Lastly for the face, I have the Anastasia Beverly Hills “Sweets” Glow Kit. I got this palette for my birthday last year and it has been the only thing I reach for when it’s time to “get my glow on”. You might be intimidated to put a pink or purple highlight on, but the powder is so smooth and it reflects in just the
right way so it shows as a subtle tint. Marshmallow (white gold) is great for lighter complexions and Butterscotch (gold with glitters) is awesome when you want that blinding highlight. Sassy Grape (holographic purple) is perfect for when you feel a little daring or going to a party and Taffy (gold-pink)
can be used when you want a warmer look to your face.

Left to right: Taffy, Butterscotch, Sassy Grape, Marshmallow.
Eyes

If you’re a makeup lover and you haven’t heard of this palette, you must have been living under a rock! This is the Jaclyn Hill x Morphe palette. For the past couple of months, this palette has been my go-to. It’s the only one I brought when I went on my trips and the one I reach for every day, no matter what
look I’m going for. Specifically, the shadows on the right side of the palette are my favorite for fall! All of them have a warm undertone and are great for a smoky eye.

Left to right: Chip, Jacz, Cranapple, Firework, Hunts.
Lips

Last but not least, I couldn’t leave without mentioning my favorite dark lippies for the season. I picked out three that I’ve already been wearing non-stop and are great to pair with a cute sweater and a smoky eye. From left to right; Mac lipstick in Whirl, and both NYX Soft Matte Lipcreams in shades Copenhagen
and Transylvania. Whirl is a matte mauve that I like to wear with taupe/brown shadow on the eyes. Copenhagen is a hybrid of a liquid lipstick but much more comfortable, in a rich red shade. And lastly, Transylvania is a deep purple that I like to pair with simple eyes when I’m going for an edgy look.

I hope you liked seeing some the products I’ve been loving and will continue to use throughout the season! Have an awesome week and stay funky!
Instagram – miaa__
Twitter – mia__danielle
Email – mdb181@txstate.edu
Rose Water: Buy or Bye?
Now, you may be reading the title of this article and saying “um isn’t that just water that smells pretty?” Well… yes. However, like coconut oil, it has many benefits for both skin and hair. This product from Teak Naturals that I got off of Amazon for $9.97 is a “100% pure, organic, and natural Moroccan Rose floral water” that is supposed to act as a toner for both your hair and face.
This is what the product looks like!

As you can see, the packaging is rather beautiful. I love the design of the label and I’m a sucker for a nice glass bottle! When you get this product in the mail, it not only comes with the spray applicator as you see in the picture, but it also comes with a regular screw on top (not pictured, sorry) so that you can carefully pour the product onto the desired area.
Today, I will only be judging this product on my skin (face), but let me know if you want to test it out on my hair as well!
On the bottle, Teak Naturals claims that this product will act as a “natural toner to balance pH levels and close pores…[as well as] nourish and soothe skin.” Nowhere does this product claim to help makeup last longer throughout the day. Therefore, the longevity of my makeup will not affect what I think of this product just so you’re aware.
After cleansing and moisturizing my face in the morning, like I typically do, I sprayed the Rose Water directly on my face and then patted it into my skin with my fingers. I then put on my NYX Born to Glow primer (cause your girl needs all the hydration her face can get) and rubbed that into my skin before applying my makeup.
This is how my makeup turned out after application!


I got to admit, I wasn’t sure how this product would benefit my skin, but it really did close up my pores and made my skin feel fresh and hydrated! It also helped the application of my makeup to go on extremely smoothly! Now, my skin is super dry, so in order to combat that I tend to apply concealer under my eyes and red areas before I apply foundation which is typically unheard in the makeup world. By doing this, I find that my dry patches and the areas where my pores show through are more covered. For this test, I applied foundation and concealer as the makeup gods would approve of and I gotta say I was surprised at how seamlessly my base went on!
Now, I know that I said the longevity of my makeup wouldn’t affect my opinion of the product, and that still remains true. However, what Buy or Bye would this be if I didn’t show you what my makeup looked like at the end of the day?


That night, I ended up going to my boyfriend’s gig to support his band’s, Kodiak Arrest, new EP release on Spotify and iTunes. This meant that I was outside in the humidity for several hours which as you makeup lovers know, that is makeup suicide!! However, my makeup surprisingly survived better than I expected it to. As you can see, the foundation on my forehead and nose did separate (like it normally does) by the end of the night, but for the most part, my makeup did stay in place!
Overall, I think that the Teak Naturals Rose Water is a great product for both dry and oily skin! Not only does it hydrate your skin by balancing your pH levels, but because it closes pores that means that if you have oily skin, you might not be quite as prone to getting pimples as you normally would! I’d say that the Rose Water is Dana approved and I will definitely keep purchasing this product in the future!
Keep the vibes good and the eyeliner sharp!
Dana Hiser | theFMAdaily Admin
If you have questions or want me to try out hacks and products that you might be interested in, contact or dm me at…
Email: dlh226@txstate.edu
Insta: dana361
Twitter: dana_361
The Power of Makeup
Many people in society have this perception that girls wear makeup to attract boys. However, this isn’t true. Makeup has never been about attracting the opposite sex. In fact, many guys don’t like excessive amounts of makeup on women. If that was our goal, why would we go put so much makeup on?
Another misconception of makeup is that we wear it to hide out insecurities, that we don’t think we are pretty without it and therefore wear makeup as some sort of mask to hide what we really look like.
I must say that for the most part, these ideas on makeup are just not true. While some girls (or boys because it is 2017 and boys are rocking the makeup looks nowadays) do wear makeup for the reasons that people think. I’m definitely not approaching this as an absolute because everyone is different and everyone’s reasoning for wearing makeup is different. However, from what I’ve seen in the makeup community is that makeup is about empowerment and expression of your artistic ability.
Nikkietutorials, a Makeup Guru on YouTube, was the first to introduce The Power of Makeup to the world. She started a whole campaign through social media for makeup lovers to post a picture of themselves with half of their face done in full-glam makeup and the other half all natural with no makeup whatsoever through the hashtag #ThePowerOfMakeup.

Her goal was to show the world that makeup isn’t about not loving yourself or being insecure of who you are, but rather the exact opposite! We are all beautiful and powerful, so why not show it through makeup?
When I first started wearing makeup, I was in middle school. I was hoping that a little bit of eyeliner and concealer (yes, I thought that was an actual makeup routine at the time and yes, that was makeup routine for years) would help me get through my awkward stage. Believe it or not, it did! Because of that, I felt more confident with who I was and slowly but surely my makeup routine became more extensive. Before I knew it, I was in college, putting on a full face of makeup every day. Not because I think it makes me look pretty, but because I truly feel myself when I put on a full face of makeup. It truly relaxes me, but that doesn’t mean I don’t go out in public without any makeup either.
The more I discovered makeup and what it stood for, the more obsessed I became! Finding drugstore dupes to luxury brands and constantly trying new products and building up a collection of my favorites became more and more fun! So fun, in fact, that I now write about these products that I test out (obviously lol).
I hope that makeup can impact you the way it does me, and if not, I hope that you at least enjoy reading about different products and hacks that have to do with beauty products. What’s your makeup story? Let me know in the comments below!
Keep the vibes be good and the eyeliner be sharp!
-Dana Hiser
Admin of theFMAdaily
If there are any beauty products or hacks that you would like me to try, please contact me at…
Email: dlh226@txstate.edu
Instagram: dana361
Twitter: dana_361
Wunderbrow: Buy or Bye?
Hey Beauty Queens!
Ever get tired of filling in your eyebrows every single morning? Or maybe filling in your eyebrows causes you to run late for classs? This is definitely the case with me! If there was a way that I could fill in my eyebrows the night before and skip the eyebrow routine in the morning I would be a happy peach. However, I splurged and bought a high-end product ($22 on Amazon) that claims to give you an eyebrow that lasts for days! This product is called the Wunderbrow!
This is what the product looks like!

The Wunderbrow claims to give you a set of filled in brows that last for days in a matter of 2 minutes. Now, considering it takes me way longer to fill in my eyebrows with a regular eyebrow pencil or an eyebrow pomade, I highly doubt this product can give me Instagram eyebrows in 2 minutes. Nonetheless I was still extremely excited about this product!
Rather than trying the Wunderbrow in the morning before class, I tried it the night before to A) see if it could withstand a shower and B) withstand my terrible sleeping habits (my face is typically buried in my pillow all night) and C) give me enough time to screw up my eyebrows 5 times – which was actually the case. That night I took off my makeup, washed my face with my makeup remover and applied the Wunderbrow to my eyebrows. I let them completely dry, took a shower, and finished double cleansing my face to see if the product could handle a facewash.
This is what the Wunderbrow looked like before and after my shower!

I also took a picture the next morning to see if they held up through the night and it didn’t come off any more than it already had (so I didn’t feel the need to take a picture)! Even though the Wunderbrow didn’t stay on perfectly through the next morning, it did hold up well enough for me to easily fill in my brows the next morning.
The next night, I decided to try things a little differently. I took off the Wunderbrow – it comes off easily with Coconut Oil – and waited to reapply it until after I took my shower and finished my face routine that night.
Here’s what it looked like after I applied the product and the next morning!

As you can see, the Wunderbrow stayed on really well! I didn’t have to fill it in at all the next morning and I just threw on some eyebrow mascara to hold my brow hairs in place all day and carved out my eyebrows with some concealer! That night when taking my makeup off, I did my normal routine and was careful not to get my makeup remover and face wash on my brows and to see if they would hold up the next morning. I completely forgot to take a picture of it though, but my brows did hold up really well and very little product came off! I had to fill them in slightly, but that was expected.
Overall, I would give the Wunderbrow a 8/10! Now don’t get me wrong, I love the product. However, I’m docking points off because it doesn’t do everything it claims to do on the box and because it is more than I want to pay for an eyebrow product. It also took some practice to not only apply it but also figure out the best ways to keep it on my eyebrows. Nonetheless, I am very impressed with this product and I will continue to use and buy this product! Once you figure out all of the tricks to this product, it does a really amazing job of filling in and staying on your eyebrows!
However, I will say this. I’m not great at filling in my eyebrows because I just don’t have an amazing eyebrow shape to begin with! If you decide to use this product and you’re bad at filling in your eyebrows as well, just know that it’ll take some getting used to and it might take you a few tries to fill in your eyebrows the way you want them. Other than that, I don’t have any complaints with this product! I actually filled in my eyebrows the way I usually do this morning and found myself missing the Wunderbrow which is always a sign that you love a makeup product!
I hope this article was helpful to you and good luck on finals everyone! Until next time…
Keep the vibes good and the eyeliner sharp!
-Dana Hiser
If you have makeup hacks or products that you want me to test out, contact me at…
Email: dlh226@txstate.edu
Instagram: @dana361
Twitter: @dana_361
ColourPop Eyeshadow: Buy or Bye?
Hey Beauty Queens!
I don’t know about you guys, but I’m personally obsessed with ColourPop Cosmetics! Specifically, I’m obsessed with their Ultra Matte Liquid Lipstick! I’ve been buying this brand for about a year now, but other than trying out their abundant selection of lipsticks and highlighters, I have never tried their other products. The other day I got an email titled “FREE SHIPPING,” so obviously I had to order some of their products. I bought more lipsticks, but more importantly I bought an eyeshadow palette to test out for you guys!
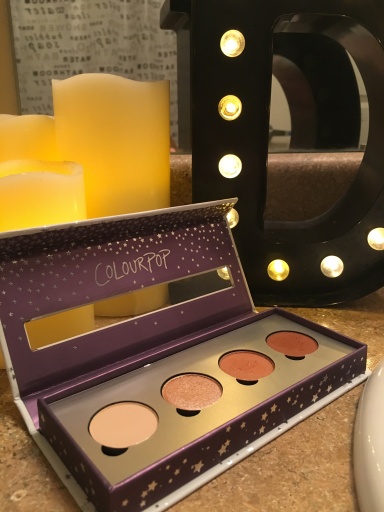
In this palette are two matte shades and two metallic/glittery shades. I swatched them, and while it wasn’t as pigmented as I would like, the formula wasn’t dusty to the point where fallout with become an issue. In the palette, Heavy Hitter, the colors that were included were Full-Zip, Ringer, Side Tracked, and Top Notch.
Before applying this product to my eye, I primed my eyelids with concealer and set that with the ivory shadow. When I was applying the brown shades I found that the product was much more pigmented when using a brush than it was when swatching with my finger. I’m not very skilled at eyeshadow to begin with, so I was a little worried when I first applied the eyeshadow to my eye. However, this product blended out easily, so whatever mistakes that I made blended out smoothly! One complaint that I did have with the palette is that there was no dark brown color included, so in order to deepen the outer corners of my eyelids, I had to go to a different palette that I had.
Here’s what my eyeshadow looks like after I finished my makeup.

Let’s just ignore the fact that my wings look more like sisters than twins today (oops), but as you can see the eyeshadow blended really well and the colors are gorgeous! There was no fallout when applying this product which I personally loved because there’s nothing more annoying than doing your eye makeup and having to clean up all the eyeshadow that fell onto your cheeks.
When I was trying this product out, I was running around all over the place with my parents who were visiting me at the time. We were exploring both San Antonio and Austin (yep, we’re that crazy), and so this was a true test to see if my eyeshadow would crease or fade at all throughout the day.
Here’s what my eyeshadow looks like after wearing it all day.

I ended up wearing my makeup for about 12 hours that day, and as you can see the eyeshadow held up really well! There was slight creasing, but nothing that was very noticeable. However, the eyeshadow itself stayed on with very little fading or fallout.
Overall, I’m very impressed with this product and would give it an 9/10! Even though the eyeshadow wasn’t super pigmented when I swatched it, I was pleased to know that it would have more color payoff when applying it with brushes. The colors in the palette are gorgeous and blend beautifully! The fact that the eyeshadow stayed on all day with minimal creasing or fallout really impressed me. However, I will say that I wish that the palette included a darker brown color so that you could deepen the outer corners.
If you’re interested in getting this product, you can go here https://colourpop.com/collections/shadow-palette/products/heavy-hitter# or if you’re interested in checking out ColourPop in general you can go here https://colourpop.com/
I hope that this blog was helpful! Until next time…
Keep your vibes good and your eyeliner sharp!
-Dana Hiser
If you have makeup products or beauty hacks that you want me to try, you can contact me at
Email: dlh226@txstate.edu
Instagram: @dana361
Twitter: @dana_361
Translucent Powder Hack: Holy Grail or Holy Fail?
Hey Beauty Queens!
Let’s face it, as much as we love Two Faced “Better Than Sex” Mascara, we can’t always afford the voluminous long lashed it gives you. Instead we throw on some fake lashes and call it a day. However, that’s easier said than done.
While scrolling through Pinterest, I found a new hack where instead of putting on fake lashes, or buying expensive mascara, you can take a disposable mascara wand and dip it in translucent powder before you put on the mascara of your choice for voluminous and long lashes that last all day long.
Here’s what you’ll need!

You’ll need an eyelash curler, translucent powder, and you’re go to mascara!
My typical lash routine is to apply a layer of Cover Girl’s Clump Crusher Mascara and then a layer of Lashblast Volume Mascara also from Cover Girl. While it looks great at the beginning of the day, I find that it flakes off and my lashes lose their curl by the end of the day. I tried lash primer, but the same thing happened, so I’m hoping that this hack will work out!
According to the hack, you’re supposed to curl your lashes as you normally would and then put a coat of translucent powder on your lashes before applying your normal mascara. If you layer your mascara like I do, the instructions say to apply more translucent powder in between each layer in order to get voluminous lashes that last all day.
Here’s what it looked like after application!

I followed as instructed and the result of this was better than expected! My lashes really were longer and had more volume to them. However, I was skeptical as to if this would actually last all day because most primers and hacks that I try for this don’t help with the product flaking off by the end of the day.
When I tried this, all I did that day was study at Alkek all day (yes, I’m that girl that studies on a Saturday). However, I did go to a recital during the evening, and checked to see how my lashes were doing before the show. They were still holding up really well, so needless to say I was pretty impressed by this! I made sure not to touch up my mascara at all before the recital, to give this hack a fair shot. By the end of the night, my lashes kept their curl and length for the most part! While there was some flaking by the end of the day, it was a lot less than normal!
This is how my lashes looked at the end of the night!

I’d say that this hack is a Holy Grail!
I admit, I was expecting this to be my first Holy Fail, but the hack did most of what it claimed to do! While there was some flaking, my lashes still looked amazing by the end of the night! I will say, that this is one of those hacks that is more difficult to do if you’re in a hurry to go somewhere because you have to wait for each layer of mascara to completely dry before applying the translucent powder (I was definitely late to my Monday 9am class because of this). That being said, this probably isn’t the greatest “hack” in terms of time saving. However, for the times where I want my lashes to last all day, I will definitely be using this hack! I’m very impressed with how well it worked! I hope that this was helpful to you all, and until next time…
May your vibes be good and your eyeline sharp!
-Dana Hiser
If you have any suggestions for hacks or products to test out, you can contact me at…
Email: dlh226@txstate.edu
Instagram: @dana361
Twitter: @dana_361
Bioré Charcoal Pore Strips: Holy Grail or Holy Fail?
Hey beauty queens!
Ever try to pick out your blackheads with your fingers because you’re just so tired of your nose looking dirty? Not only is that painful, but it’s also harmful to the skin. According to justaboutskin.com picking your blackheads can damage the Stratum Corneum which is a layer of dead skin that is about the thin as a sheet of paper that acts as a pore wall. The reason that it is so harmful to pick at this layer of skin is because it can cause damage to your pores by inflaming them and making them look even worse than they already were. I’m definitely guilty of this for both blackheads and whiteheads, but I’m here to show you a product that can help you extract your blackheads safely and effectively.

I managed to come across the Bioré Charcoal Pore Strips at CVS a couple of weeks ago and have been dying to try this product! My blackheads are particularly difficult to extract, so I wasn’t sure that this product would even work, but I thought I would give it shot!
Before you use the pore strip, you’re going to want to steam your face by either filling a bowl of hot water and covering your face with a towel for 3-5 minutes, or use a hot, damp face towel and place it on your nose for a couple of minutes to open your pores. Because my nose is so resistant to blackhead extraction, I did both techniques to make sure that I fully opened my pores up.
After this, you’re going to want to wet your nose so that the pore strip can stick to the skin and place it on your face. The instructions say to wait between 10-15 minutes or until completely dry, so I waited about 15 minutes to be sure that it dried completely.
When I peeled the pore strip off of my face, I made sure to pull it in an upward motion so that the blackheads would come out more easily. I would say that this was only slightly painful, but I do have a high pain tolerance – if you have a low pain tolerance, be sure to take this product off carefully! The pore strip was easy to take off of my face, but it did leave some of the charcoal residue on the sides of my nose. However, it’s easy to remove that with a damp wash cloth.
This is what the nose strip looked like after I used it!

I tried to take close-up pictures of my face before and after, but my phone camera just couldn’t focus well enough for you to see a difference. However, the white specks that you can see on the pore strip are the sebum and blackheads that I pulled out of my pores which was pretty satisfying if I do say so myself.
I would say that the Bioré Charcoal Pore Strips are a HOLY GRAIL!
Keep in mind that it is impossible to extract every single blackhead on your face. On that note, this product is a wonderful hack to extract your blackheads as opposed to picking them out yourself or paying a ton of money to get them professionally extracted! While it didn’t take out every single blackhead (which is perfectly fine), it extracted more than any other product that I have tried – even more than some of the high-end Black Peel-Off Masks that I have tried! If you have sensitive skin, please do be careful while using this product, because this product can be rough on the skin! Also, make sure to moisturize after use so that your skin can have some sort of relief after using this product!
Until next time….
Keep your vibes good and your wings sharp!
-Dana Hiser
If you have hacks or products that you want me to try, contact me at….
Email: dlh226@txstate.edu
Instagram: @dana361
Twitter: @dana_361
Colorista Semi-Permanent Hair Dye: Buy or Bye?
Hey there beauties!
Have you ever wanted to dye your hair a crazy color, but didn’t know how it would turn out? Or maybe you weren’t sure if you could commit to having a color other than the natural looking options in your hair? This is definitely me when it comes to dying my hair in general! Now I’m not new to dying my hair, but I’ve only ever dyed my hair natural colors such as getting blonde highlights for more dimension, or (most recently) maintaining my ginger hair by redying it ever so often.
Today, I’ll be giving my first impressions on the L’Oréal Colorista Semi-Permanent Hair Dye! I first saw this product on Roxxsaurus’ YouTube channel where she also tested out this hair dye. I thought the idea behind it was so fascinating that I just had to try it out and give my honest opinion to you lovely people!
Here’s what the product looks like!

I bought this item at Walmart here in San Marcos for $10, but I have also seen the product at Target and CVS Pharmacy. They have a line for blondes which contains more pastel colors and a line for brunettes which offers more vibrant colors that’ll show through without the use of bleach. If you decide to try this product with darker hair, the Colorista line also offers bleach for highlights, ombré, or for your complete head of hair. However, I have to warn you the bleach IS NOT semi-permanent, so unless you want to commit to blonde hair, I don’t recommend using this product because bleach is very harmful to the hair. Since I didn’t want to fry my hair with bleach, I decided to skip the bleach.
I ended up getting the color #SOFTPINK which is a pastel pink. They do have a more vibrant pink called #PINK which is probably what I should’ve done, but I wanted to use the same color that Roxxsaurus used on her channel to compare the color payoff with a darker hair color than platinum blonde.
Here’s what my hair looks like before the hair dye!

The instructions say to fully wash (with shampoo and conditioner) and dry your hair before application. When applying the product be sure to use the gloves and/or brush that comes in the package. After applying, you want to wait about 20-30 minutes (but I waited about 45 minutes because my hair is darker than recommended), and wash it out completely in the shower. Finally, you can blow-dry and style your hair as desired.
This was my final result compared to Roxxsaurus!
The Colorista hair dye gave me a very subtle color payoff compared to Roxxsaurus, but I do love the almost Rose Gold color it gave my hair. Overall, I’d probably give the L’Oréal Colorista Semi-Permanent Hair Dye a 7/10. I like how my hair turned out, but I do wish the color was more vibrant and noticeable. I think the next time I use this product; I’ll use one of the more vibrant colors in either the blonde or brunette Colorista line. However, it’s nice to know that if you want a subtle color or tint in your hair, people with slightly darker hair can use the pastel colors to achieve this if they leave it in for about 45 minutes.
I love the idea of being able to dye your hair to see what you might look like with a fun color in your hair for a short amount of time before you fully commit to it. I wish that the Colorista line would come out with more color options for brunettes or those with darker hair. However, because this is a fairly new product, they might come out with more variety in the future.
I like the ability of being able to play around with different hair colors without having to commit to anything. Because this product doesn’t have ammonia in it, you don’t have to worry about the dye effecting already dyed hair or damaging your hair (unless you use the bleach). I will definitely continue to use this product for times where I just feel like adding a little more excitement to my hair! So until next time….
Keep the vibes good and the eyeliner sharp!
-Dana Hiser
Send me hacks or products you want me to rate by contacting me through…
Email: dlh226@txstate.edu
Instagram: @dana361
Twitter: @dana_361
Wet N’ Wild Photo Focus Foundation: Buy or Bye?
Hi Makeup Lovers!
Welcome to my first Buy or Bye article where I test out beauty products and tell you whether they are worth the buy or not! Today, I’ll be testing out the Wet N’ Wild Photo Focus Foundation in the shade Porcelain, but this product comes in a great variety of shades that people with darker skin tones would be able to find easily as well! This product is only worth about $5 from Walmart – containing 1 fluid ounce – and claims to eliminate photo flashback. This means that when you take photos with the flash on with your camera, your makeup might reflect that light back at the camera causing a sort of white cast on one’s face. And let’s face it, no one wants to look like a ghost when they’re showing off to the world of Instagram or Snapchat that they’re having a good time!
Here’s what the product looks like!

I first came across this product by watching makeup guru and YouTuber, Tati, who reviews both high end and drugstore makeup. In her video, she was surprised at how well the product worked and left me intrigued. Shortly after this product hit the market, one of theFMAdaily readers, Rebekah, contacted me and wanted me to try it out as well. I checked the CVS by the Texas State campus to see if they had it but struck out. I also checked Walmart and managed to find what I thought would be a good color match for my skin tone.
The first time I applied the foundation to my face I dotted it around my face and blended it out with a Real Techniques Sponge and quickly realized that was a mistake. Because of the foundation’s thicker formula, it becomes harder to blend into your skin if you just dot it on your face and blend it out. I then removed the foundation and tried a different approach. The bottle comes with a spatula applicator, so I used that and scooped the product onto my face followed by blending (of course) with that same makeup sponge. This method worked A LOT better and it blended out the product flawlessly!
Here’s what the foundation looks like!
As you can tell, I have red patches all over my face (thank you pale skin…), which can be difficult to cover up with a light coverage foundation. However, I would say this product has a medium coverage, but is buildable – meaning you can layer the foundation for a fuller coverage look. As you can see with one coat of the foundation, my face is pretty much evened out and my pimples didn’t need much concealing at all afterwards!
Here’s what it looked like by the end of the day!

My last test for this product was to see how it wore throughout the day and as you can see there was some spreading of the foundation where my red patches started to show through. However, keep in mind I was testing this out while I was going back to Corpus Christi for spring break where I was in and out of rain and humidity. Overall it stayed on better than majority of the drugstore foundations I have tried in the past!
That all being said, I think I would rate this product a 9/10! Not only does the foundation give decent coverage, but it feels light on the skin and didn’t cause me to break out like some foundations do. The foundation has a flawless look to it which I became obsessed with, and find myself reaching for this product daily! The product line for this foundation also has a great variety of different shades that I feel both darker and lighter skin girls can easily find! However, one thing I would say is that the foundation has a thicker formula which not only makes it harder to blend out if using the wrong application method, but this foundation will give you a little shine later in the day if you have oil-prone skin. It’s not going to give you a HUGE shine, but it’s just something to keep in mind.
May you keep your vibes good and your wings sharp!
-Dana Hiser
If you have any beauty products or hacks you want me to test out, contact me at…
Email: dlh226@txstate.edu
Instagram: @dana361
Twitter: @dana_361
Coconut Oil Makeup Remover: Holy Grail or Holy Fail?
Hey makeup lovers!
Have you ever seen Instagram, Pinterest, and YouTube hacks and wonder if they really work? Well then you’ve come to the right place! This is where you get to read about my beauty adventures where I test out different beauty hacks and makeup products and give my honest reviews and impressions on them. I’m going to test everything from beauty hacks you’ve probably heard of to the crazy weird hacks that’ll have you going “…what?” In no way, am I a makeup guru like Tati or Nikkietutorials. I’m just a makeup addict who loves a cheap dupe and a good beauty hack.
 Now let’s get to the article!
Ever have those days where you needed to use water proof everything on your eye makeup? Let’s face it. While you’ll look bomb all day long, taking that makeup off in the evening is a nightmare! However, the internet has an answer to that problem! According to YouTuber, Tess Christine, using Coconut Oil helps take off eye makeup easily while being gentle on the eyelids.
Let’s put this hack to the test!
I’m personally a fan of using the Almay Oil-Free Makeup Remover Pads and then double cleansing my face with the Neutrogena Makeup Remover Cleanser and the Neutrogena Oil-Free Face Wash. My hopes with this hack is to shorten my nightly face-care routine for those nights where I’m feeling extra lazy.
In order to test this hack fairly, I put on my full-glam makeup look using all of my smudge-resistant, water-proof, and longer-lasting makeup products. However, rather than just trying this hack on my eyelids only like Tess did, I thought I’d use it on one half of my face to see how it worked.

The first thing I did was I took a small amount of coconut oil onto my finger and started rubbing it on my eyelid. I noticed the eye makeup I was wearing was breaking down and coming off almost immediately! I then moved onto my eyebrow and the rest of that half of my face, just gently rubbing the coconut oil into my face. I couldn’t believe how easily my makeup was coming off! Now I will say that my skin doesn’t handle oil products very well, so I did make sure to wash my face thoroughly after applying the coconut oil to prevent a breakout which did make my nightly face routine take slightly longer than normal. However, the side that I applied the coconut oil to was smoother than the side that I used my normal face-care products on!
Overall, I’d say this hack is a Holy Grail!!

The coconut oil broke down my makeup quickly and easily while being gentle on my skin, but it did make my face-care routine longer than normal. That being said, I think this hack is great for people who have particularly sensitive skin that cracks and is susceptible to dry patches because the coconut oil gives moisture to your face while removing the makeup. However, you do have to remember that it is oil, so if your skin is susceptible to breakouts, I wouldn’t use this hack too often if at all. If you have combination skin, I think this hack is great to use on your eye makeup only, but I wouldn’t apply it all over your face, especially in the T-zone area.
I will definitely be using this hack again on the days I want a full-glam look! However, I think I’ll only use it on my eyelids rather than my full face so I don’t breakout. I hope that this review was helpful and that you might try this hack for yourself!
May your vibes be good and your eyeliner sharp!
-Dana Hiser
If you know of any beauty hacks you want me to test, you can contact me through…
Email: dlh226@txstate.edu
Instagram: @dana361
Twitter: @dana_361